
BLOG
How to Export and Share Videos From CapCut PC

CapCut Desktop Video Editor is one of the advanced and versatile video editors for PC used by creators in general and primarily by social media content creators in particular, thanks to its increasing popularity on popular social media websites such as YouTube, Instagram, and TikTok.
Although CapCut is popular for its intuitive nature and incredible list of capabilities, perhaps one of the most important features of video editing itself is exporting your project in optimum format. For social media production, professional projects, or just personal projects, exporting and uploading your videos out of CapCut Desktop Video Editor is the key to displaying your content elegantly on all platforms.
Why Proper Exporting Matters?
First, let’s discuss why exporting your video correctly is so important. When you’re importing raw footage into a video edit, the footage is generally in a high-quality format. But when you’re editing and applying effects, it can change the file size and resolution. By exporting with the correct settings, you’ll be able to keep the quality of your video, ensure that it’s the correct size for the platform you’re placing it on, and upload it smoothly without any technical issues.
Step 1: Complete Your Video Project
Before you ship out, you must make all the edits you need for your video. These include:
Cutting and Trimming: Remove all the unnecessary shots, stops, and irrelevant portions.

Adding Transitions and Effects: Add transitions, filters, or effects in between the clips to enrich your video.
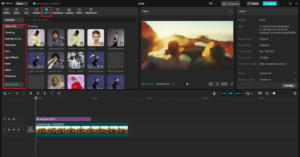
Adding Audio: Make sure your background music, voiceovers, and sound effects are well synchronized and balanced.
Text and Titles: Include any text, titles, or credits for your video. Make sure these are clear to read and understand.
Additionally, CapCut’s AI caption generator can help automate subtitle creation, making your video more accessible and engaging.
Once you’re satisfied with your edits, now is the time to export.
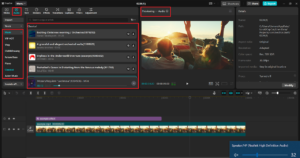
Step 2: Click the Export Button
Once you are ready to export, it is simple for CapCut Desktop Video Editor to find the export option. This is how:
Find the Export Button: On the top right-hand side of the CapCut interface is the Export button. Click on it to bring up the export settings window.
Select Export Settings: There are some export settings that you can customize using CapCut. We will divide the most critical settings, which you would like to customize.
Step 3: Export Settings Configuration
In the export window, there are several settings that you can adjust to prepare your video as per your needs. The following are the most crucial settings to keep in mind:
- Resolution
The resolution of your video determines how crisp and vivid it will be when it plays. CapCut gives you a choice of exporting your video into different resolutions, typically 720p, 1080p, and 4K.
- 1080p is best suited for the majority of YouTube and social media websites since it has great clarity and is a standard resolution for HD material.
- 4K is ideal if you wish to export at the highest quality possible, particularly if you are uploading to professional sites or wish to future-proof your material.
- 720p will be okay if you are dealing with smaller file sizes or if you are going to play your video on lower-resolution devices.
- Frame Rate
The frame rate is the number of frames per second in your video. The higher the frames per second, the smoother the motion. Common frame rates you can utilize in CapCut include 30 fps or 60 fps.
- 30 fps is used most and is the default for YouTube videos, as it provides a smooth viewing experience without significantly adding to file size.
- 60 fps is typically employed for game shots or high-speed action content, and it has extremely smooth movement, but at higher file sizes.
- Video Format
The video format determines how your video file is stored and how it will be played on different devices. The most accepted and used video format is MP4 because it is the optimal quality and compression balance. It is supported by almost every platform and device, and therefore it is the optimal choice for social media and online video sharing.
- Bitrate
The bitrate also determines the quality and size of the exported video file. High bitrates provide high-quality but large-sized files, whereas low bitrates provide small file sizes but may sacrifice video quality.
- Audio Settings
Make sure your audio settings are compatible with the video’s audio requirements. CapCut offers you the possibility of changing the audio bitrate to get better sound quality, but using a normal bitrate of 192 kbps or 256 kbps is acceptable for most YouTubers.
If you’re adding voice overs or background music, ensure that the audio is well-balanced and clear before exporting.
- File Name and Place
Before hitting the final export button, save your video and select where the file will be stored on your hard drive. You need to select one that is conveniently located, particularly if you will be uploading it right away on a site.
If you’re aiming for high-quality production, integrating CapCut’s AI video maker features can help enhance your video with automated effects, scene transitions, and smart editing tools.
Step 4: Export the Video
Once you’ve set your export setting, click the Export button. Your software will now be rendering your video, and this will take a few minutes to an hour or more, depending on how long, complex, and what resolution your project is. CapCut will be encoding your video to your selected format and settings in this time.
Conclusion
Sharing and exporting CapCut Desktop videos is simple, but the export settings you choose can make a really big difference in how great your final video looks overall. By tweaking your resolution, frame rate, bitrate, and more, you can make sure that your video is just right for where you are posting it. If you’re posting on YouTube, Instagram, TikTok, or anywhere else, CapCut Desktop Video Editor has everything you need to export and share your best-of-class content that engages your audience. By following these steps, you’ll be well on your way to making and sharing great videos that you get seen!

Introduction
In a world where information moves faster than ever, finding a reliable and easy-to-consume news source is essential. Breezy News has emerged as a modern platform designed to deliver fresh updates in a quick, accessible, and engaging way. Whether you are looking for breaking news, local updates, or trending stories, Breezy News aims to keep you informed without overwhelming you.
What is Breezy News?
Breezy News is a digital-first news platform that focuses on providing concise, timely, and reader-friendly content. Unlike traditional outlets that may present lengthy reports, Breezy News emphasizes clarity and speed, making it ideal for modern audiences.
Core Focus Areas
- Breaking news updates
- Local and community stories
- Trending topics
- Lifestyle and human-interest content
- Quick-read articles
How Breezy News Works
The platform is built around simplicity and accessibility.
Content Delivery
Articles are designed to be short, informative, and easy to read on mobile devices.
Real-Time Updates
News is published quickly to keep readers informed about current events.
Digital Accessibility
Users can access content through:
- Websites
- Social media platforms
- Mobile-friendly interfaces
Key Features of Breezy News
1. Fast and Fresh Updates
Breezy News focuses on delivering news as it happens, ensuring readers stay current.
2. Easy-to-Read Format
Short paragraphs and simple language make content accessible to all readers.
3. Wide Content Variety
From local updates to global trends, the platform covers diverse topics.
4. Mobile Optimization
Designed for users who consume news on smartphones and tablets.
Why Breezy News is Gaining Popularity
Several factors contribute to its growing appeal:
- Quick and digestible content
- Focus on relevant and trending topics
- Strong presence on social media
- User-friendly reading experience
In an age of information overload, platforms like Breezy News provide a refreshing alternative.
Role in Modern Digital Media
Breezy News reflects the shift toward:
- Short-form journalism
- Real-time reporting
- Audience-focused storytelling
It aligns with how modern readers prefer to consume news—quickly, clearly, and on-the-go.
Benefits of Using Breezy News
Saves Time
Readers can stay informed without reading lengthy articles.
Easy Accessibility
Available across multiple devices and platforms.
Engaging Content
Designed to keep readers interested and informed.
Community Connection
Often highlights local stories that matter to readers.
Challenges Facing Platforms Like Breezy News
Despite its advantages, there are challenges:
- Balancing speed with accuracy
- Competing with larger media outlets
- Avoiding misinformation in fast reporting
- Maintaining credibility
Successful platforms must ensure fact-checking and responsible journalism.
How to Get the Most Out of Breezy News
To use the platform effectively:
- Follow official pages for updates
- Cross-check important news with reliable sources
- Engage with content for better recommendations
- Stay aware of trending topics
Conclusion
Breezy News represents the future of digital journalism—fast, accessible, and reader-focused. With its emphasis on fresh updates and simplified storytelling, it has become a go-to source for modern news consumers.
FAQ’s
1. What is Breezy News?
Breezy News is a digital news platform that provides quick and easy-to-read updates on current events and trending topics.
2. Is Breezy New’s reliable?
It aims to provide timely information, but readers should verify important news from multiple trusted sources.
3. What type of content does Breezy New’s cover?
It covers breaking news, local updates, lifestyle topics, and trending stories.
4. How can I access Breezy New’s?
You can access it through its website, social media platforms, and mobile devices.
5. Why is Breezy New’s popular?
Its short, engaging, and mobile-friendly content makes it appealing to modern readers.
Introduction
The term Chainiste is not widely defined in mainstream dictionaries, yet it has begun appearing in various online discussions, niche communities, and conceptual frameworks. Whether used in technology, philosophy, or branding, Chainiste carries an air of mystery that sparks curiosity.
This guide explores what Chainiste could mean, where it might come from, and how it is being interpreted in modern contexts.
What is Chainiste?
At its core, Chainiste appears to be a conceptual or emerging term rather than a strictly defined word. It is often interpreted in multiple ways depending on context.
Possible Interpretations
- A person or system connected to chains or networks
- A philosophy centered on interconnected systems
- A digital or blockchain-related concept
- A brand or identity built around connectivity
Because the term lacks a fixed definition, it is considered flexible and evolving.
Etymology and Origins
The word “Chainiste” likely derives from:
- “Chain” – representing connection, sequence, or linkage
- “-iste” – a suffix often used to describe a follower, specialist, or practitioner
Together, the term could suggest “one who works with or believes in chains or interconnected systems.”
Chainiste in Technology
One of the most common interpretations of Chainiste is in the tech world, especially linked to Blockchain.
Possible Tech Meanings
- A blockchain enthusiast or expert
- A developer working with decentralized systems
- A supporter of distributed ledger technology
In this sense, a Chainiste might represent someone deeply involved in modern digital infrastructure and decentralized innovation.
Chainiste as a Philosophy
Beyond technology, Chainiste can also be viewed as a philosophical concept.
Core Ideas
- Everything is interconnected
- Actions create chains of consequences
- Systems influence one another continuously
This aligns with broader ideas found in systems thinking and network theory.
Chainiste in Digital Culture
In online communities, Chainiste may be used as:
- A username or identity
- A niche community label
- A conceptual brand name
It reflects modern internet culture where new terms emerge organically and gain meaning through usage rather than formal definition.
Applications of the Chainiste Concept
1. Technology & Innovation
Used to describe professionals working in blockchain or network systems.
2. Business & Branding
Companies may adopt the term to represent connectivity and modern thinking.
3. Philosophy & Thought Leadership
Represents interconnected thinking and systemic awareness.
4. Creative Fields
Writers and creators may use it symbolically to represent relationships and continuity.
Why Chainiste is Gaining Attention
Several factors contribute to its rising interest:
- Growth of blockchain and decentralized systems
- Increased focus on interconnected digital ecosystems
- Curiosity around unique and modern terminology
- Branding appeal due to its futuristic tone
Challenges in Defining Chainiste
Despite its appeal, the term faces limitations:
- No official or standardized definition
- Multiple interpretations leading to confusion
- Lack of academic or institutional recognition
This makes it more of a conceptual keyword than a formal term.
Future of Chainiste
The future of Chainiste depends on how it is adopted:
- It could become a recognized term in tech communities
- It may evolve into a brand or movement
- It could remain a niche concept with flexible meaning
Like many modern digital terms, its value lies in how people use and define it over time.
Conclusion
Chainiste is a fascinating example of how language evolves in the digital age. Whether viewed through the lens of Blockchain, philosophy, or branding, it represents the idea of connection and interconnected systems.
FAQ’s
1. What does Chainiste’s mean?
Chainiste’s is an emerging term often associated with interconnected systems, blockchain, or conceptual philosophies.
2. Is Chainiste a real word?
It is not officially defined in dictionaries but is used in niche and digital contexts.
3. Is Chainiste related to blockchain?
Yes, it is often interpreted as being connected to blockchain and decentralized technologies.
4. Can Chainiste be used as a profession?
Informally, it could describe someone working with network systems or blockchain technologies.
5. Why is Chainiste gaining popularity?
Its modern, flexible meaning and connection to digital innovation make it appealing in online communities.

Introduction
Vivek Mehra stands out as a dynamic leader whose career spans corporate leadership, entrepreneurship, education, and thought leadership. His journey reflects a blend of innovation, resilience, and a deep commitment to knowledge dissemination—making him a notable figure in the global publishing and education ecosystem.
Early Life and Educational Foundation
While detailed early-life records are limited publicly, Vivek Mehra’s academic and professional path reflects a strong foundation in business, leadership, and intellectual pursuits. His later engagement with law studies and a PhD in management highlights his continuous dedication to learning and growth.
Rise in Corporate Leadership
Leadership at SAGE Publications India
One of the most defining phases of his career was his role as:
- CEO and Managing Director
- Later Chairman
At SAGE Publications India, he played a key role in expanding academic publishing, fostering global collaborations, and strengthening access to scholarly content. His leadership contributed significantly to enhancing the reach of research publications in emerging markets.
Entrepreneurial Vision
Founder of Vikramshila Research Pvt Ltd
After a successful corporate career, Vivek Mehra transitioned into entrepreneurship by founding Vikramshila Research in 2023.
Key Goals of the Venture:
- Promote open-access research publishing
- Support scholars from developing countries
- Contribute to building a “knowledge-driven society”
This move highlights his vision of democratizing knowledge and making academic research more accessible worldwide.
Contributions Beyond Business
Thought Leadership and Mentorship
Vivek Mehra is more than a corporate executive. His contributions include:
- TEDx speaker, sharing insights on leadership and innovation
- Startup mentor, guiding emerging entrepreneurs
- Workshop trainer, focusing on publishing and ethics
Academic Engagement
He actively teaches research publishing and ethics to PhD students and continues to pursue his own doctoral studies, demonstrating his lifelong commitment to education.
Awards and Recognitions
His impactful work has earned him multiple accolades:
- Business Excellence and Innovative Best Practices Academia Award (2019)
- Sharda Top Rankers Excellence Award for Visionary Leadership (2016)
- Vijayshree Award (Government of Maharashtra, 1994) for simplifying agricultural technology
These awards reflect his contributions across industries—from publishing to technology and education.
Leadership Style and Philosophy
Key Traits
- Vision-driven thinking: Focused on long-term impact rather than short-term gains
- Commitment to learning: Continuously evolving through education and research
- People-centric leadership: Known for building teams and nurturing talent
He describes himself as a “rational optimist,” emphasizing balanced thinking and continuous discovery.
Impact on Publishing and Education
Vivek Mehra’s influence extends into:
- Expanding academic publishing in emerging economies
- Promoting ethical research practices
- Supporting global knowledge exchange
His work bridges the gap between traditional publishing and modern digital dissemination.
Personal Interests
Beyond his professional life, he is known for:
- Practicing yoga and squash
- Exploring philosophy and intellectual thought
- Writing and sharing perspectives through blogs
These interests contribute to his well-rounded leadership approach.
Challenges and Growth
Like many visionary leaders, Vivek Mehra’s journey includes:
- Navigating the shift from traditional to digital publishing
- Building a startup after a long corporate career
- Adapting to evolving global education systems
His ability to embrace change has been a key factor in his success.
Legacy and Future Outlook
With initiatives like Vikramshila Research, Vivek Mehra continues to:
- Champion open knowledge ecosystems
- Inspire future leaders and scholars
- Shape the future of global publishing
His journey reflects a commitment to making knowledge accessible and impactful on a global scale.
FAQ’s
1. Who is Vivek Mehra?
Vivek Mehra is an Indian publishing executive, entrepreneur, and founder of Vikramshila Research, known for his contributions to academic publishing.
2. What is Vivek Mehra known for?
He is best known for his leadership at SAGE Publications India and his work in promoting open-access research.
3. What is Vikramshila Research?
It is a research publishing platform founded by Vivek Mehra to make scholarly content accessible globally.
4. Has Vivek Mehra received any awards?
Yes, he has received multiple awards, including the Business Excellence Award and the Vijayshree Award.
5. Is Vivek Mehra involved in education?
Yes, he teaches research publishing and ethics and is pursuing a PhD in management.
6. What is his leadership style?
He is known for visionary, people-centric, and learning-driven leadership.
7. What is his current focus?
He is focused on expanding open-access publishing and mentoring the next generation of leaders.
Conclusion
Vivek Mehra exemplifies what it means to be a visionary leader in the modern era. From corporate success to entrepreneurial innovation, his journey highlights the power of knowledge, leadership, and continuous growth.
-

 TECH1 year ago
How Cyber Security Services Help Organizations Manage Cyber Risk
-

 BLOG1 year ago
Slothokiturbo.net: Exploring the World of Online Gaming and Community
-

 BLOG1 year ago
Literoticatags: Exploring the World of Erotica and Its Online Community
-

 TECHNOLOGY1 year ago
Aagmal: The Future of Innovation and Efficiency
-

 BLOG2 years ago
Erothtos: Understanding Its Role in Today’s World 2025
-

 BLOG1 year ago
The Versatility and Convenience of a 5’x5′ Square Folding Table
-

 HOME1 year ago
From Script to Screen: Top Educational Programs for Future Screenwriters That Actually Work
-

 FASHION1 year ago
Achieve the Perfect Beard with Black Male Beard Products