
HEALTH
Transform Fat to Fit: Kettlebell Exercises for Weight Loss

Introduction
Kettlebell training has become a fantastic way to lose weight. This fun form of exercise not only helps in burning fat but also builds strong muscles. With a kettlebell, you can enjoy a diverse range of workouts that keep your routine exciting.
Kettlebells are like mini-gyms themselves. They allow you to mix cardio and strength training efficiently. The secret to their effectiveness is in how they challenge your body as a whole. Unlike regular weights, kettlebells engage multiple muscle groups at once, leading to a higher calorie burn and increased metabolism.
According to the American Council on Exercise, kettlebell workouts provide numerous health benefits. These exercises improve overall fitness, offer conditioning, and help in weight management. The best part? You can vary your kettlebell exercises easily, tailoring them to your unique fitness goals.
What is Kettlebell Training for Weight Loss?

Kettlebell training is a form of strength and conditioning workout that uses a cast-iron or steel ball with a handle. Originating from Russia in the 18th century, this versatile tool is now popular worldwide for fitness.
Here’s why kettlebell training makes a great addition to your weight loss journey:
- Customization for Weight Loss: You can adjust kettlebell exercises to fit your fitness levels and goals. Routines can be intensified by increasing repetitions or weight.
- Calorie Burning: Kettlebell workouts are notable for their ability to torch calories quickly. By engaging major muscle groups simultaneously, you can experience an effective full-body workout.
- Metabolism Boost: Regular kettlebell sessions help boost your metabolism, aiding in fat loss even after you’ve finished your workout.
A study from the Mayo Clinic supports the effectiveness of such workouts, highlighting their potential to improve cardiovascular health and aid weight loss. Whether you’re new to fitness or a seasoned athlete, kettlebell training offers a dynamic way to shed pounds and build strength.
Top Kettlebell Exercises for Weight Loss

Kettlebell exercises are an excellent way to torch calories and target various muscle groups simultaneously. These exercises are not only effective for burning fat but also improving strength and endurance. Below, let’s explore some essential kettlebell exercises that can help you on your weight loss journey:
Kettlebell Swings:
- How to Do It: Swing the kettlebell between your legs and then up to chest height by thrusting your hips forward.
- Benefits: Boosts calorie burn and improves cardiovascular fitness by engaging multiple muscles.
- Safety Tips: Keep your back straight and hinge at the hips rather than squatting.
Goblet Squats:
- How to Do It: Hold the kettlebell at chest level and perform a standard squat.
- Benefits: Targets the lower body while improving balance and core strength.
- Safety Tips: Ensure your knees track over your toes and your core is engaged throughout.
Turkish Get-Ups:
- How to Do It: Start lying down, hold the kettlebell overhead, and stand up while keeping the kettlebell extended.
- Benefits: Enhances full-body strength, stability, and coordination.
- Safety Tips: Keep the kettlebell over your shoulder and move slowly to maintain control.
Kettlebell Snatches:
- How to Do It: Pull the kettlebell from the ground to an overhead position in one motion.
- Benefits: Works several muscle groups, improving power and acceleration.
- Safety Tips: Use your hips for power, and watch your wrist to avoid impact injuries.
These exercises are fundamental in a kettlebell workout for weight loss. Incorporating them into your routine can help shed fat and build muscle effectively.
Designing a Kettlebell Workout for Weight Loss
Creating a kettlebell workout plan can seem daunting, but with the right structure, you can transform your fitness journey into success.
Sample Weekly Workout Plan:
- Monday: 3 sets of 12 kettlebell swings, 3 sets of 10 goblet squats
- Wednesday: 3 sets of 5 Turkish get-ups each side, 3 sets of 8 kettlebell snatches each side
- Friday: Combines exercises with shorter rest periods for a high-intensity workout
Rest and Recovery:
- Allow at least one rest day between sessions to give your muscles time to repair.
- Adequate rest is vital for progress and can help prevent injury.
Safe Progression Tips:
- Start with a lighter kettlebell to master techniques and reduce the risk of injury.
- Gradually increase weight or repetitions as you gain strength.
- Incorporate variety every week to challenge different muscle groups and keep your workout interesting.
For more tips and techniques, check out Men’s Health, which provides insights into crafting effective workouts while avoiding injury.
Remember, consistency and progression are key when incorporating kettlebell workouts into your fat loss routine. Take it one step at a time and listen to your body to maximize your progress.
Benefits of Kettlebell Workouts for Fat Loss

Kettlebell workouts are more than just a way to shed pounds, they offer a host of additional benefits:
- Efficiency and Time-Saving: Kettlebell exercises combine strength and cardio, offering a full workout in a short period. This makes them excellent for those with tight schedules.
- Improved Coordination: These workouts often require balance and coordination, leading to improvements in these areas over time.
- Strength Building: While helping with fat loss, kettlebell workouts also build muscle, which can support more long-term weight management and health benefits.
Supporting studies on the benefits of kettlebell workouts are available on PubMed, showing the positive impact on health and fitness.
Safety Tips for Fat Burning Kettlebell Exercises
Safety is crucial when performing any kettlebell exercises, especially if your goal is weight loss. Here are some essential tips:
- Master the Basics: Before adding weight, ensure you understand the basic movements and proper form. This reduces the risk of injuries.
- Start with a Comfortable Weight: Choose a weight that allows you to complete the exercises with good form but still challenges you. A beginner can typically start with a weight between 8-12 kg.
- Focus on Form and Technique: Proper form is essential to avoid injuries. Ensure your back stays straight, and movements are controlled. Videos and tutorials from trusted sources can help you get it right.
- Progress Gradually: Increase weight and intensity gradually. Rapid progression can lead to strains and injuries.
- Listen to Your Body: If you feel pain, apart from usual muscle fatigue, stop and assess your technique. It’s better to rest and recover than to push through and risk an injury.
Real-Life Success Stories and Testimonials
Kettlebell training for weight loss has helped many individuals achieve remarkable transformations. Let’s look at some real-life success stories to see the potential impact of these workouts.
- James’ Transformation:
- James lost 30 pounds in six months by incorporating fat-burning kettlebell exercises into his routine.
- He focused on kettlebell swings and goblet squats, which helped boost his metabolism and build muscle.
- Sophia’s Fitness Journey:
- Sophia gained strength and flexibility while losing 15 pounds over four months.
- Her routine included kettlebell snatches and Turkish get-ups, which targeted various muscle groups.
- She discussed the importance of form and consistency in her fitness blog post.
- David’s Cardio Boost:
- David improved his cardiovascular health through consistent kettlebell workouts for fat loss.
- His regimen included high-intensity interval training with kettlebell exercises.
- You can read more about his journey and advice for maintaining motivation in a feature on a reputable health website.
These stories highlight how kettlebell workouts for weight loss can lead to significant improvements in health and fitness. They also emphasize the importance of dedication and persistence.
Starting Your Kettlebell Journey Today
Embarking on a kettlebell workout journey can transform your fitness and health. Here’s how you can get started:
- Recap the Benefits: Kettlebell exercises for weight loss are effective because they:
- Burn calories efficiently
- Build muscle strength
- Enhance cardiovascular health
- Take Action:
- Visit a local gym to attend a kettlebell class.
- Purchase kettlebells for home use to start a workout routine.
- Explore different training programs to suit your goals, whether it’s weight loss, strength building, or flexibility enhancement.
- Stay Motivated:
- Set achievable goals and track your progress.
- Join online communities or local fitness groups for support.
- Keep informed about new exercises and techniques from trusted fitness resources.
Your journey with kettlebells can lead to incredible results. Remember, consistency and proper technique are key to transforming fat to fit.
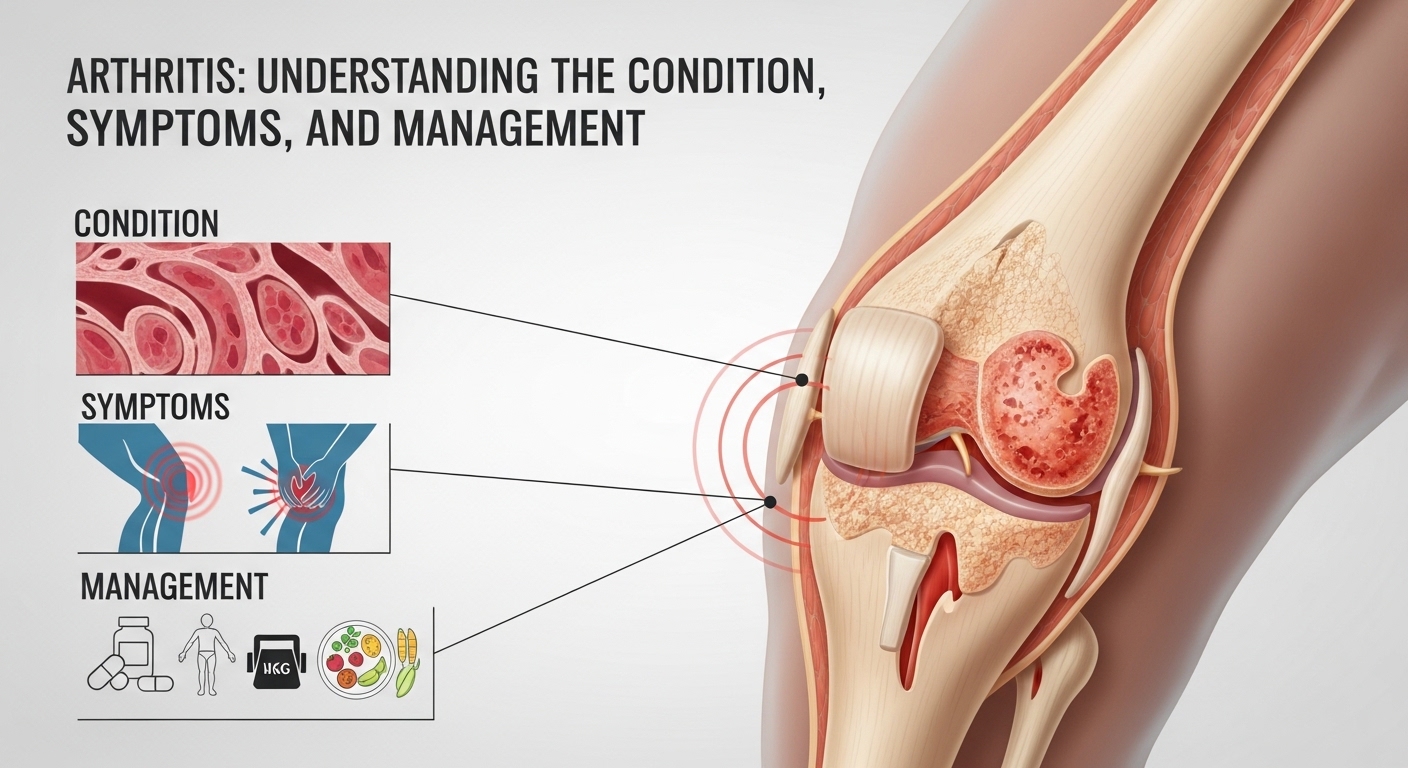
Attrities is a term often encountered in discussions about health, particularly relating to joint discomfort and mobility issues. While the term may sometimes be confused with attrition in organizational or military contexts, in medical usage, it is closely associated with arthritis—a common condition that affects millions worldwide. This article explores Attrities in depth, covering its causes, types, symptoms, and management options to provide a comprehensive professional overview.
What Are Attrities?
In the medical context, Attrities is most likely a reference to arthritis, a condition characterized by inflammation of the joints. Arthritis can affect people of all ages, though it is more common in older adults. The condition results in joint pain, stiffness, swelling, and decreased mobility, which can significantly impact daily activities and quality of life.
There are over 100 types of arthritis, ranging from osteoarthritis, which occurs due to wear-and-tear of cartilage, to rheumatoid arthritis, an autoimmune disorder where the immune system attacks joint tissues. Despite variations in cause and severity, the common thread among all forms of arthritis is joint dysfunction and discomfort. Understanding Attrities as arthritis emphasizes the need for early recognition and effective management to prevent long-term damage.
Causes of Attrities
The causes of Attrities vary depending on the type of arthritis. Osteoarthritis, the most common form, is typically caused by aging, joint injury, or repetitive stress on the joints. Genetics and obesity also play significant roles in increasing susceptibility to this condition.
Rheumatoid arthritis, on the other hand, is an autoimmune disorder where the immune system mistakenly targets the lining of the joints, causing inflammation and joint deformity over time. Other forms of Attrities may result from infections, metabolic issues like gout, or chronic inflammatory conditions. Identifying the specific cause is crucial for effective treatment planning.
Symptoms of Attrities
Symptoms of Attrities often develop gradually but can sometimes appear suddenly. Key signs include joint pain, tenderness, swelling, and stiffness, particularly in the morning or after periods of inactivity. In advanced cases, patients may experience reduced range of motion, joint deformities, and chronic fatigue.
Different types of arthritis may also present unique symptoms. For example, rheumatoid arthritis commonly affects symmetrical joints, whereas osteoarthritis often impacts weight-bearing joints like the knees and hips. Recognizing these patterns is vital for accurate diagnosis and timely intervention.
Diagnosis and Medical Assessment
Diagnosing Attrities involves a combination of physical examination, medical history, and imaging tests. Doctors often use X-rays, MRI scans, or ultrasound to assess joint damage and inflammation. Blood tests may also help identify autoimmune forms of arthritis, such as rheumatoid arthritis or lupus-related joint conditions.
Early diagnosis of Attrities is critical to slowing disease progression and reducing long-term joint damage. Healthcare providers emphasize monitoring symptoms and seeking medical evaluation if joint discomfort persists for more than a few weeks.
Treatment and Management Options
Managing Attrities typically involves a multi-faceted approach tailored to the type and severity of arthritis. Medications play a central role, including anti-inflammatory drugs, pain relievers, corticosteroids, or disease-modifying antirheumatic drugs (DMARDs) for autoimmune forms.
Lifestyle modifications are equally important. Regular exercise helps maintain joint mobility and muscle strength, while a balanced diet can support overall health and reduce inflammation. In severe cases, surgical interventions such as joint replacement may be necessary to restore function and relieve pain. Combining medical, physical, and lifestyle strategies is often the most effective way to manage Attrities.
Alternative Interpretation: Attrition
While the medical interpretation of Attrities relates to arthritis, the term may also be mistakenly used in organizational or military contexts, referring to attrition. In this sense, attrition describes the gradual loss of people from a program, workforce, or recruitment process. For example, military recruits dropping out during training could be described as attrition.
Though distinct from arthritis, this interpretation highlights the importance of context when using the term Attrities, ensuring clarity whether discussing health or organizational metrics.
Preventive Measures
Preventing Attrities in the arthritis sense focuses on protecting joint health and maintaining overall well-being. Regular physical activity, weight management, ergonomic adjustments, and avoiding repetitive joint stress can reduce the risk or severity of arthritis.
Early detection of symptoms also allows for prompt intervention, which can prevent complications such as chronic pain or reduced mobility. In high-risk individuals, routine check-ups and proactive lifestyle modifications can be particularly beneficial.
Living with Attrities
Living with Attrities requires ongoing attention to joint health and pain management. Patients are encouraged to develop a comprehensive care plan with healthcare providers, incorporating medication, exercise, and dietary strategies. Support groups and educational resources can also provide emotional and practical assistance.
Maintaining an active lifestyle, while respecting joint limitations, is essential. Adaptive techniques and assistive devices may further improve independence and quality of life for those affected by arthritis-related Attrities.
Conclusion
Attrities, most commonly associated with arthritis, represents a significant health concern affecting millions worldwide. By understanding its causes, symptoms, and treatment options, individuals can take proactive steps to manage the condition effectively. While occasionally confused with organizational attrition, the medical interpretation emphasizes the importance of joint care, early intervention, and holistic management strategies.
Recognizing and addressing Attrities empowers patients to maintain mobility, reduce pain, and enhance quality of life, making awareness and education critical components of health management.
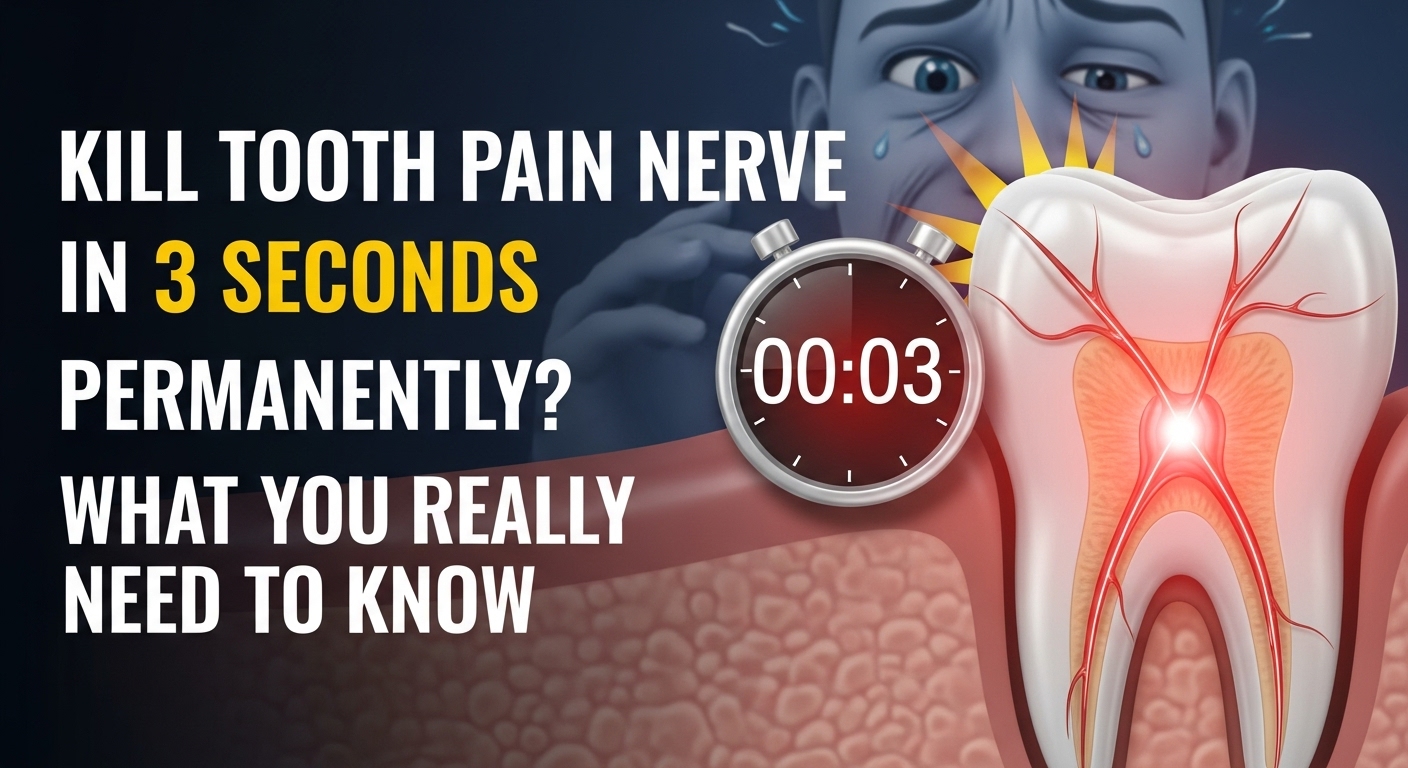
In today’s fast-paced world, dental pain feels unbearable, and it’s no surprise many people search online for ways to “kill tooth pain nerve in 3 seconds permanently.” Severe toothaches disrupt work, sleep, and overall quality of life. But can you truly end the pain instantly and permanently at home? The short answer is no—yet there are safe, effective ways to get relief and achieve a lasting solution.
This article explores what causes tooth nerve pain, why “quick fixes” are risky, and the proven options for permanent relief.
Understanding Tooth Nerve Pain
At the core of every tooth lies the pulp, which contains blood vessels and nerves. When bacteria or trauma inflame this pulp, the resulting pain can be intense. Common causes include:
-
Deep cavities exposing the nerve
-
Cracks or fractures reaching the pulp
-
Infections under the tooth (abscesses)
-
Gum disease exposing root surfaces
Because the nerve is living tissue, there is no safe at-home method to destroy it “in 3 seconds.” Only professional dental treatment can remove or treat a tooth nerve properly.
Why People Search “Kill Tooth Pain Nerve in 3 Seconds Permanently”
The phrase itself reveals the desperation many feel when experiencing a severe toothache. People want:
-
Immediate relief from unbearable pain
-
Permanent solutions so the pain won’t return
-
Low-cost or at-home remedies to avoid dentist visits
While the urgency is understandable, quick fixes often worsen the problem. Unverified online “hacks” involving chemicals, extreme temperatures, or sharp tools can cause infection, tissue damage, and even life-threatening complications.
Safe Ways to Manage Tooth Pain Temporarily
Although you can’t “kill” a tooth nerve at home, you can reduce pain until you see a dentist:
-
Over-the-counter pain relievers (ibuprofen or acetaminophen) as directed.
-
Cold compresses on the outside of the cheek to reduce swelling.
-
Saltwater rinses to help clean the area and soothe inflamed tissue.
-
Topical anesthetic gels containing benzocaine (used sparingly).
-
Elevating your head at night to reduce blood pressure in the area.
These measures don’t fix the underlying problem but can help you cope until you reach professional care.
Professional Treatments That Permanently Eliminate Tooth Nerve Pain
Dentists have several procedures to permanently stop nerve pain:
-
Root Canal Therapy (RCT): Removes infected pulp and seals the tooth. This is the most common permanent solution while keeping the tooth intact.
-
Extraction: If a tooth is beyond repair, removing it eliminates the nerve and the source of pain.
-
Pulp Capping or Partial Pulpotomy: In some cases, the dentist treats only part of the pulp to preserve tooth vitality.
-
Antibiotics: Used when infection spreads beyond the tooth, but always in combination with a definitive procedure.
These treatments are performed under local anesthesia, so you won’t feel pain during the procedure—and once completed, the source of the nerve pain is permanently resolved.
Why Permanent Relief Requires Professional Care
Attempting to “kill” a tooth nerve without dental training is dangerous. Risks include:
-
Infection spreading to the jaw or bloodstream
-
Damage to surrounding teeth or tissues
-
Uncontrolled bleeding or nerve injury
-
Delayed diagnosis of serious conditions (like abscesses or tumors)
Dentists use sterile techniques, precision instruments, and X-rays to ensure proper treatment and safe healing.
Modern Dentistry Makes Treatment Quick and Comfortable
One reason people search for “3 second” solutions is fear of the dentist. But modern dentistry offers:
-
Fast pain relief with local anesthetics and sedation options
-
Digital imaging for accurate diagnosis
-
Minimally invasive tools that shorten appointment times
-
Payment plans or insurance coverage to ease financial stress
Most patients find that once they’re numbed, treatment is far less painful—and far faster—than they feared.
Preventing Future Tooth Nerve Pain
Prevention remains the best strategy. You can minimize the risk of severe toothaches by:
-
Brushing twice daily with fluoride toothpaste
-
Flossing once a day to prevent gum disease
-
Limiting sugary foods and drinks
-
Visiting your dentist every 6 months for checkups
-
Addressing small cavities early before they reach the nerve
By maintaining oral health, you reduce the chances of ever needing emergency dental care.
The Role of Emergency Dentists
If you’re in severe pain outside normal office hours, search for an emergency dentist. Many offer same-day appointments, after-hours care, or on-call services. Immediate professional attention not only relieves pain but can save the tooth.
Looking Ahead: Advances in Dental Pain Management
Research into regenerative dentistry, pulp therapy, and biomaterials is ongoing. In the future, dentists may be able to heal tooth nerves instead of removing them. Until then, root canals and extractions remain the gold standard for permanent relief.
The Takeaway
While it’s tempting to believe there’s a way to “kill tooth pain nerve in 3 seconds permanently,” the reality is that only a dentist can safely remove or treat a tooth nerve. Home remedies can temporarily ease discomfort, but they cannot fix the root cause.
Modern dentistry makes permanent pain relief achievable, comfortable, and far faster than most people expect. Don’t risk your health with unverified shortcuts—seek professional care to end tooth pain for good.

In today’s fast-moving world where pets are part of the family, dog owners face all kinds of unexpected challenges. One common yet often misunderstood emergency is when a dog is stung by a bee. Just like people, dogs can experience anything from mild irritation to severe allergic reactions after a sting. Understanding how to respond quickly and appropriately can make the difference between a minor incident and a true medical emergency.
This article explores what happens when a dog is stung by a bee, the steps to take immediately afterward, and how you can prevent future stings. By knowing the warning signs and treatments, you’ll feel empowered to protect your four-legged friend.
Why Bee Stings Affect Dogs Differently
When a dog is stung by a bee, the bee’s venom enters the dog’s skin through a tiny stinger. This venom contains proteins that can cause pain, inflammation, and in some cases, trigger the immune system to overreact. Dogs tend to get stung on their paws, faces, or noses because of their curious nature — sniffing flowers, pawing at buzzing insects, or playing outside.
The reaction depends on several factors:
-
Location of the sting – The mouth, throat, or around the eyes can be more dangerous.
-
Size and age of the dog – Smaller dogs may react more severely.
-
Sensitivity or allergies – Some dogs are more prone to allergic reactions than others.
Being alert to these factors helps you assess the seriousness of the situation.
Signs Your Dog Was Stung by a Bee
Not all bee stings look dramatic at first. Recognizing the symptoms early is crucial. Common signs include:
-
Sudden yelp or whimper followed by pawing or licking at a spot.
-
Redness, swelling, or a small raised bump at the sting site.
-
Scratching or rubbing the affected area.
-
Localized pain or tenderness.
More serious reactions can include:
-
Facial swelling or hives spreading across the body.
-
Difficulty breathing or excessive drooling.
-
Vomiting, diarrhea, or collapse (signs of anaphylaxis).
If you notice severe reactions, treat it as a veterinary emergency.
Immediate Steps When a Dog Is Stung by a Bee
When your dog is stung by a bee, taking quick action can relieve discomfort and prevent complications:
-
Stay calm and move your dog away from the area.
Bees often sting in groups. Remove your dog from flowers or hives to prevent more stings. -
Locate and remove the stinger.
If the stinger is visible (a small black dot with a sac), scrape it off with a credit card or dull knife edge. Avoid squeezing it — that can release more venom. -
Apply a cold compress.
Use a clean cloth or ice pack wrapped in a towel for 5–10 minutes to reduce swelling. -
Soothe the area.
A paste of baking soda and water or a pet-safe topical treatment can neutralize venom and ease irritation. -
Monitor your dog closely.
Keep an eye out for worsening symptoms over the next few hours, especially difficulty breathing or severe swelling.
When to Call the Vet
Not every dog stung by bee incident requires a veterinary visit, but knowing when to call a professional can save your dog’s life.
Seek immediate veterinary attention if:
-
Your dog is stung multiple times.
-
The sting is inside the mouth, throat, or near the eyes.
-
Your dog shows any sign of allergic reaction (facial swelling, vomiting, trouble breathing).
-
Your dog is very young, very old, or has pre-existing health conditions.
Your veterinarian may administer antihistamines, steroids, or epinephrine in severe cases. They can also provide guidance on at-home care tailored to your dog’s weight and health history.
At-Home Care After a Bee Sting
Once the initial emergency has passed, you can help your dog recover with gentle care:
-
Keep the area clean and dry to prevent infection.
-
Use an Elizabethan collar (cone) if your dog keeps licking or scratching the sting.
-
Offer plenty of water and a quiet resting spot.
-
Follow any medication instructions your vet provides, such as antihistamines or pain relievers.
Most dogs recover within 24–48 hours with proper care.
Preventing Future Bee Stings
While you can’t eliminate all risks, there are steps to reduce the chances of your dog being stung by a bee again:
-
Monitor outdoor play.
Avoid letting your dog roam near beehives, flowering plants in full bloom, or areas with heavy insect activity. -
Trim your lawn and garden.
Bees are attracted to tall grass and flowering weeds. Regular maintenance can reduce bee presence. -
Use pet-safe insect repellents.
Never use human bug sprays on dogs, but some pet-specific repellents can discourage insects. -
Train your dog to “leave it.”
Teaching this command helps your dog avoid pawing or snapping at bees and other insects.
Understanding Allergic Reactions in Dogs
A single sting might be minor, but repeated stings can sensitize your dog’s immune system, leading to stronger reactions in the future. Talk to your vet about:
-
Allergy testing if your dog has reacted severely.
-
Emergency kits for allergic dogs, such as epinephrine injectors.
-
Preventive strategies if you live in areas with high bee populations.
The Emotional Side of Pet Emergencies
When a dog is stung by a bee, it’s not just the dog who’s frightened — owners are too. Staying calm is key. Your dog looks to you for reassurance, and your quick thinking can reduce stress and improve outcomes. Keep your veterinarian’s number handy and know the location of the nearest emergency clinic.
Looking Ahead: Empowered Pet Ownership
Bee stings are part of life outdoors, but they don’t have to be a disaster. By understanding the risks, recognizing the symptoms, and acting quickly, you can protect your pet from harm. The phrase “dog stung by bee” doesn’t have to conjure panic — it can instead be a prompt for preparedness and responsible pet care.
As pet parents become more proactive about their animals’ health, we’re seeing a shift toward better education, faster emergency responses, and preventive measures. Just as modern business leaders blend strategy with social good, modern pet owners blend love with informed action, ensuring their pets’ safety and wellbeing.
Key Takeaways
-
A dog stung by a bee can experience anything from mild irritation to life-threatening reactions.
-
Act immediately: remove the stinger, apply a cold compress, and watch for allergic signs.
-
Contact a veterinarian for severe or multiple stings.
-
Prevent future incidents with smart outdoor habits and training.
Knowing what to do in advance can save precious time and help your furry companion recover quickly.
-

 BLOG1 year ago
Slothokiturbo.net: Exploring the World of Online Gaming and Community
-

 TECH10 months ago
How Cyber Security Services Help Organizations Manage Cyber Risk
-

 BLOG10 months ago
Literoticatags: Exploring the World of Erotica and Its Online Community
-

 BLOG1 year ago
Erothtos: Understanding Its Role in Today’s World 2025
-

 BLOG1 year ago
Leah Gettens: Everything You Need To Know
-

 BLOG1 year ago
Watchmenontheall Calvin: An Exploration of Themes, Characters, and Significance
-

 BLOG1 year ago
Use 1.5f8-p1uzt – A Comprehensive Guide!
-

 TECH1 year ago
Mansrufer: Pioneering Progress in Technology